
RESTORATION OF ROBS 1972 BC1(1608cc)


 2021
2021 


When I started the restoration of my car, back in May of 1987, the first part of the job was to strip the car down to the bone. Every component was removed. Aside from the accessible and easily removable metal pieces, the strip down also included all glass, plastic, chrome trim, electrical components and wiring. The first sheet metal to go was the quarter panels (rear guards). As you can see, removing the right quarter panel revealed a lot of hidden rust. This was a clear indication of what I had in store with the rest of the car
Please note: All pictures during the restoration are of poor quality being that at the time we did not have digital cameras!
Fig 1-1 
Fig 1-1: You may notice the small evenly distributed spots were the old quarter panels were welded. The best way to remove them is simply drilling out each spot weld. This way you don’t distort and bend any of the thin body structure when using an air chisel. It will make it so much easier when aligning up the new panels straight before welding
Fig 1-2 a

Fig 1-2 b

Fig 1-2c

Fig. 1-2 a, b and c: Right rear inner structure repair. All porous and surface rust has been cut out. All these new inner pieces had to be fabricated by hand.
Fig 1-3

Fig. 1-3: The left inner structure had lots of hidden rust.
Fig 1-4 a

Fig 1-4 b

Fig 1-4 a and b: Left rear inner structure repair. This was in worse shape than the right.
Next I went on to the rear of the car, the lower valance panel.
Fig 1-5
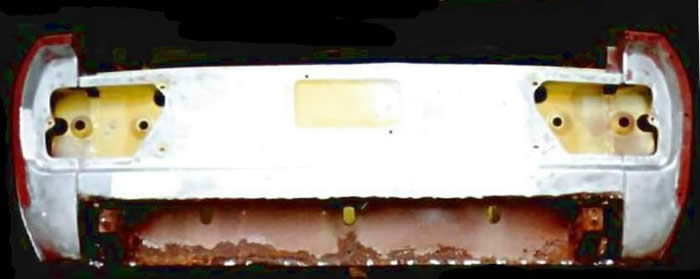
Fig 1-5. You’re looking at the area behind the rear bumper after the valance was removed. I had my suspicionabout the presence of rust because there was surface rust and soft metal along the pinch weld. Sure enough, after cutting the panel out, there it was…
Fig 1-6

Fig 1-6. Lower valance panel repair. If you look carefully, you’ll notice that most of the severe rusting occurred at the lower end of the valance while the surface rust was manifesting itself towards the top. Rather than grinding or blasting that surface rust, I cut it out completely. I strongly recommend removing and replacing those compromised surfaces with clean, new and stronger metal. This way, you can pretty much guarantee no further problems.
Fig 1-7

Fig 1-7. Lower valance sealed. This inner section is now repaired, sealed and ready to have the new hand-made valance welded on. Rust won't be a problem here anymore.
Fig 1-8

Fig 1-8. The next step I took on was removing the rocker/sill panels. Right inner rocker panel removed as you see this area wasn't spared either! Lots of rust hidden on both sides. 124s, especially Coupes, are notorious for rusting in these areas. Externally, the tell-tale sign is the bubbling, or a crumbly soft pitch weld where outer/inner panel and floor board are welded up together. If you notice it on your car you can be sure to find the rot underneath requiring immediate attention.
Fig 1-9

Fig 1-9. Right inner rocker repair. To repair this section, I did not limit the job to just welding a couple of metal patches. I actually cut the entire factory piece out. Central to a good repair job is the use of good gauge steel. I could have saved myself a bit of money, time and effort using a thinner gauge but here I kept it consistent with the factory metal.
Fig 1-10

Fig 1 - 10. Right front fender removed. This is a critical point on the car. The lower fender attachment at the rocker panel provides rigidity and strength. It bears the weight of the doors and also serves as reinforcement for your jacking point. About a year after purchasing the car, I had to change a flat tire on the side of the road one night. I remember the confusion of watching the original Fiat jack extend without so much as lifting the wheel a millimeter off the ground. When I looked under the car, I was more than little surprised to see that the entire section, weakened by rust, had crumbled under the weight of the car while I was jacking. That was really the moment I knew I would have to restore this car completely.
Fig 1-11
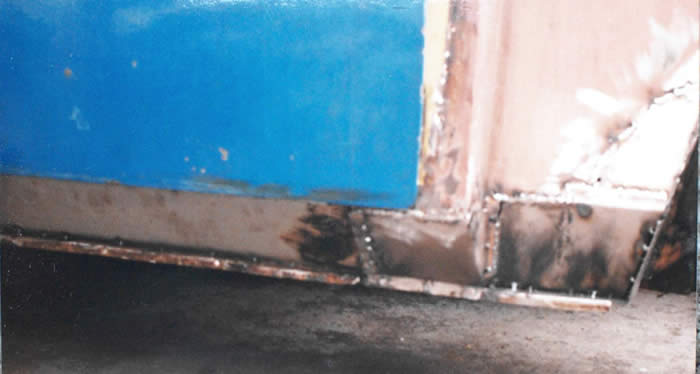
Fig 1 - 11. Right front fender inner structure repaired. You get an idea here of what it took to restore this section back to spec. The box section was carefully cut out as one whole unit and then copied to the millimeter on the workbench. Much easier.
Fig 1-12

Fig 1 - 12. Right front jack support repaired. Again here the section was carefully cut out as one whole unit and then copied to the millimeter on the workbench. Frame and jacking point is now done. The left side of the car was in the same shape and required the same work. Unfortunately, the pictures on this work were not very good but the previous photos will give you the right idea of what was involved.
Fig 1-13 a
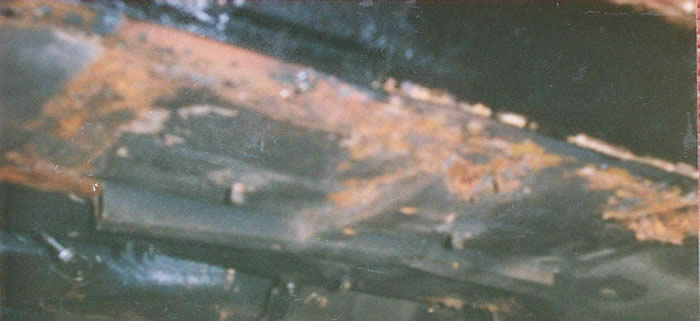
Fig 1-13b

Fig 1-13 a and b. The underneath was not pretty and the drivers side was the worst. A large section of the frame rail had to be reconstructed. Also most of the of the floorboard was soft and crumbly in some areas.
Fig 1-14
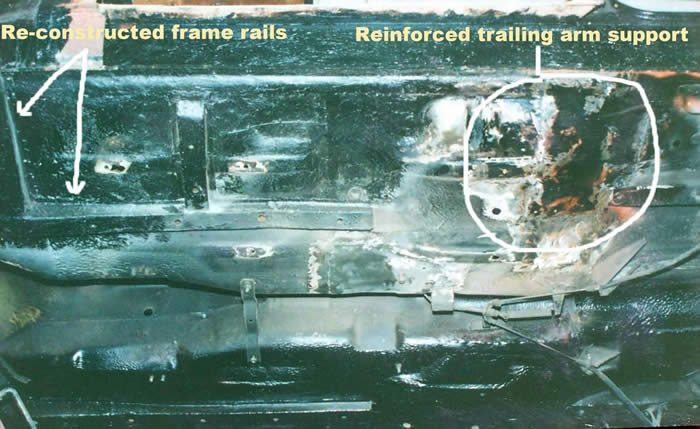
Fig 1-14. The rear trailing arm supports were very weak too. Some fabricating/strengthening was needed as well on both sides
Fig 1-15

Fig 1 - 15. You’re looking at a section of floorboard from beneath the car. Specifically, it is the mounting surface for the center bearing support bracket. This is a weak point on 124s and I strongly recommend that you inspect and assess this area before starting any restoration. It’s easily overlooked. This area carries the wait of the driver’s seat and it tends to weaken over time, not just from the driver’s weight but also as a result of the loads exerted on the center bearing. From here it was on to the front end which required most of the work.
Next section of the car to repair was the engine bay
Fig 1-16a

Fig 1-16b

Fig 1 - 16 a and b. This part of the car was a rusty mess with the majority of the rust having worked its way in from underneath. The problem stems from the fact that the AC and BC Coupes had no protective inner fender as on the CCs. So exposure to the elements was unavoidable. It's not such a problem if you live in So Cal or Arizona, but I lived in the rust belt of British Columbia's lower mainland where the damp weather and the liberally salted roads during the winter months nearly sealed my Fiat's fate. I almost gave up on her here, but I just couldn't bear the thought of sending my Coupe to the crusher. It was a true test of my enthusiasm but I'm glad I stuck it out.
Fig 1-17a

Fig 1-17b

Fig 1 - 17 a and b. Removing all the rust from this section was hard work but I had to be meticulous, I wanted a flawless finish. To me, the thought of showing the car meant that first impressions under the hood were just as important as those outside. And that means going beyond just shiny chrome. The rad support and fender rails are in place Have a good look. There was actually a lot more work done here than is readily visible. You’ll notice the edges where the upper fenders attach; the rails on each side had to be hand made. In addition to facilitating the fender attachment, the rails serve to create the water drainage channel between the hood and fenders, really important! The upper radiator support was also removed by drilling out the countless spot welds. Once removed, I was able to rework it and eliminate the waviness in the sheet metal. This also allowed better access to the headlight housings, their mounting brackets and the bulkheads immediately behind them. The housings needed complete re-fabrication. The brackets and bulkheads were cleaned and reinforced.
Fig 1-18

Fig 1 -18 Fire wall, clutch cable support repaired. You’re looking at the section of firewall where the brake booster mounts and through which the clutch cable is routed. This is a soft spot on 124s, especially Spiders. This section of metal is thin and it weakens and flexes over time through repetitive clutch operation. Most city driven Coupes and Spiders (as there are simply more of them), given the many gear changes, will likely require this work once in their lifetime. If you experience it being hard or difficult to shift all the gears, then your car might need attention in this area. Or the clutch pedal has weaked over time and deformed where the cable end attaches.
Next section of the car to repair was the front end
Fig 1-19 a

Fig 1-19 b

Fig 1-19 a and b. All the work performed on the front end of the chassis including the newly fabricated box sections right behind the headlight housings and the new front lower inner valence structure.
Next was the front suspension points to deal with
right side Fig 1-20a left side Fig 1-20b


Fig 1-20 a and b. The front suspension domes were rusty as well. This is a weak point through out the 124 model range and my car was not spared.
Fig 1-21 a Fig 1-21 b


Fig 1-21 a and b. The front suspension domes repaired.
Fig 1-22

Fig 1- 22. The right side bumper support frame was also rusty. Naturally being right underneath the battery tray over the years the battery acid makes it's way down.
Fig 1-23a

Fig 1-23a. Complete box section removed. Inner piece re-fabricated
Fig 1-23b

Fig 1-23b. Before welding on the new section the bumper bracket was installed to make sure nothing was out of alignment.
Fig 1-23c

Fig 1-23c. Complete new box section welded on
Next step was to seal up and rust proof the chassis
Fig 1-24a

Fig 1-24b

Fig 1-24c

Fig 1-24 a, b and c. These pictures show a completely de-rusted, sealed and protected chassis ready to accept the mint OEM NOS Fiat body panels. This was make it or break it point of the restoration. It was now imperative for me toseal all the nooks and crannies before welding on the panels, otherwise you will compromise all the repair work you’ve just done. The best sealer to apply is an epoxy “water resistant” variety. Do that first. Then, if you want, you could add a sound proofing/under coat on top. My goal was that this car was not going to rust for MANY years.
The next step in the process is the panel preparation but we need to do one final bit of prep to the chassis. Look closely and you will notice a silver lining along the bottom of the inner rocker panel, door support frame and so on. These are the surfaces to which the new body panels are to be spot welded. They have been treated with a “weld-through” coating. This extra step will guarantee that there will be no rusting on these areas in the future. Finally, a seam sealer will need to be applied along various points on the quarter panels and front fenders. No half measures here. This body has been protected far more thoroughly than the factory ever would have done
Fig 1-25 
Fig 1- 25. No such thing as overkill when it comes to rust protection. So that all my labour would not be in vain, all the new sheet metal were afforded the same level of careful preparation. The two front fenders, front lower valance panel, two rocker panels and the two complete rear quarter panels were all coated in behind with epoxy primer and sealed before being welded to the car. Along the edges you see the silver “weld-through” coating described earlier. What you dont see are the NOS doors, those were sealed once on the car.
Fig 1-26a 
Fig 1-26b

Fig 1-26c

Fig 1- 26. a, b and c. The car is at a good point of the restoration now, both sides are straight and aligned. The lower front valance and front fenders attached and nicely aligned. Assuming you are fortunate enough to find OEM NOS body panels, they may well have primer but it would be inadequate at best. More than likely, they’ll have some surface rust. Keep in mind that OEM NOS sheet metal parts for the Coupe will have been sitting around for at least 35 years. Through time and even the mildest humidity in the air, surface rust will eventually manifest itself, a testament to the poor quality primers of the day. The simplest the best thing to do is to remove all the primer and bring the panel down to bare metal, as I have done.
Following these steps will guarantee long lasting rust free metal.
1 Use a metal conditioner to clean the entire bare metal surface so the (etching primer) will properly adhere to the metal.
2 Spay a thin coat of etching primer. Do not sand.
3 When the etching primer has flashed (dried), spray immediately with a couple of coats of two part epoxy primer. This will finally seal and protect your panels’ external surfaces.
4 Now, you can spray any two-part catalyzed 2k acrylic primer, used in the prepping and painting stage. By the way, since you’ve gone this far on your restoration, don’t economize on sealers and primers. ALWAYS use top quality products.
Fig 1-27a

Fig 1-27b

Fig 1-27c

Fig 1-27d

Fig 1- 27 a,b,c and d. At this stage after I did the bare metal conditioner treatment, I applied a coat of etching primer, then a couple of coats of two part epoxy primer, then I applied 4 coats of two-part catalyzed 2k acrylic primer. Block sanded the entire car with dry paper only. While I was sanding out the waves I would stop as soon as I would hit/see red. I did not want to sand too deep and touch bar metal. If you look carefully at the pictures you see many red spots, that is the epoxy primer. I did not want to go past this point, remember this primer was very important to seal the out side moister and protect the metal.